


In our previous article, we discussed the basic skills you'll need to get started with anime drawing. It's now time to advance!
Today, we'll delve into the area of software skills.
In this article, I'm going to share my tips on how to hit the ground running with Clip Studio Paint!
I understand that diving into new software can be intimidating, but that's exactly why I've created this concise guide—to help you get familiar with Clip Studio Paint more quickly.
Let's GOOO!

Why I Love Clip Studio Paint?
Flexible interfaces, highly customizable tools tailored for anime art and manga production, an enormous art asset store, and a lively community!
Above is the reason I chose Clip Studio Paint as my main tool to create my anime art for more than 6 years.
It's genuinely my go-to for creating art. I wouldn't be talking about it if I didn't truly use it or didn't find something useful!
Below is a piece of artwork that I've crafted using Clip Studio Paint!
This is what you can achieve when you elevate your art skills while mastering this incredible drawing software.

So, get ready for my quick and easy steps that will prep you for the thrilling next phase: letting your anime art flourish!
📍 IMPORTANT NOTE:
The following guide focuses on Clip Studio Paint on PC or Mac.
Step #1: Install CSP On Your Device
The first step is to install CSP on your device. If you're new and don't have CSP on your device, you can download it as a trial version for free here.
Clip Studio Paint is compatible with;
- Windows / macOS
- iPadOS / iOS (iPad & iPhone)
- Galaxy / Android / Chromebook
They have two version of CSP for you to choose from: EX and PRO:
- Clip Studio Paint EX includes multi-page illustration and animation tools. It is most effective for creating comics, manga, and webtoons.
- Clip Studio Paint PRO offers less features than Clip Studio Paint EX. However, it is less expensive and adequate for any illustration work!
- My advice is to go with EX if you want to do comics or animation, and PRO if you just want to draw illustrations. (I personally use PRO)
If you want more information about Clip Studio Paint, you can find it on my blog here!
Step #2: Initial Setup
Once you finish the installation, let's open the software and start our initial settings!
1. Pen Pressure Setup
Customizing the pen pressure to match your unique hand pressure will significantly enhance your drawing experience, making every stroke feel natural and effortless.
To get started, open a new canvas by pressing Ctrl+N Then navigate to File > Pen Pressure Settings.
Here, doodle some lines on your tablet, using the hand pressure that feels most comfortable to you.
Clip Studio Paint will automatically adjust the pressure graph to sync with your unique touch.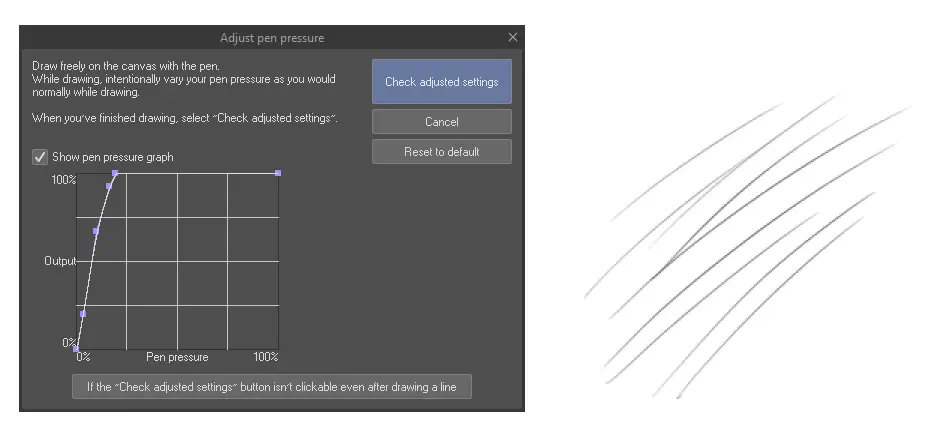
Once that's done, click on ‘Check adjusted settings' to lock in your personalized settings.
2. Undo Levels Setup
Undo levels in Clip Studio Paint dictate how many steps the software remembers for the ‘undo' command.
The higher the number, the more steps you can retrace.
However, be cautious—setting this too high can affect the software's performance. I've found my sweet spot at 80 levels.

To tweak this to your preference, navigate to File > Preferences > Performance.
3. Auto Recovery Setup
In Clip Studio Paint, the File Recovery feature acts as a safety net, making it stress-free even if your device unexpectedly shuts down without saving your work.
To tailor this feature to your needs, go to File > Performance > File.
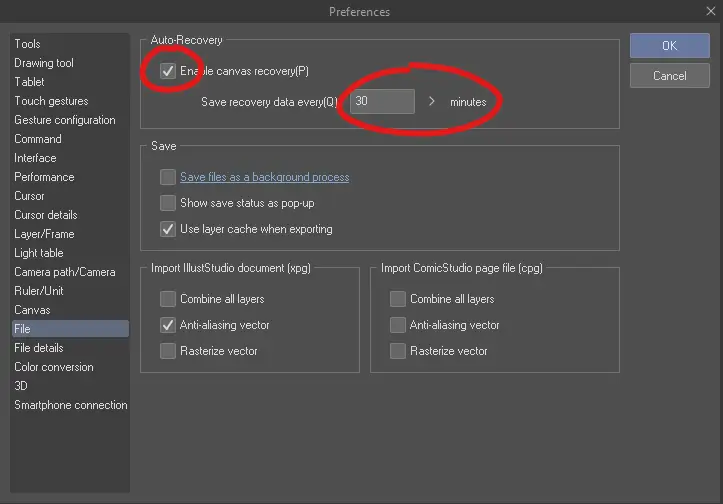
Here, you can either enable or disable the auto-recovery option and set the time interval for auto-saving.
I personally have mine set to save every 30 minutes.
Keep in mind, though, that setting the auto-save interval too frequently could affect your system's performance.
4. Workspace Setup
One thing I absolutely adore about Clip Studio Paint is its highly customizable workspace.
Whether you're a comic artist, animator, or illustrator, you can create a workspace that's tailored just for you!
If you find the initial workspace setup a bit overwhelming, don't worry! You can easily simplify it by removing any tools you don't need.
This way, you can create a minimalistic environment that lets you focus on what truly matters: your art!
💡MiMi Tips: Since I'm right-handed, I've positioned most of the tools on the right side of the screen for easier navigation. Below, you'll see the actual workspace setup that I've been comfortably using for years.

Step #3: Explore Your Initial Drawing Tools
Once you've got your workspace all set up, it's time for the real fun to begin: explore the drawing tools!
1. Pen
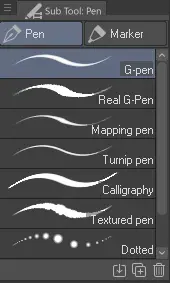
Hotkey: P
Use Case: Line Art
Perfect for comic artists and beyond, the Pen tool is your go-to for impeccable line art. Just hit “P” on your keyboard to access it instantly. Not only doing the line art, it's also fantastic for applying solid colors to your art.
2. Pencil
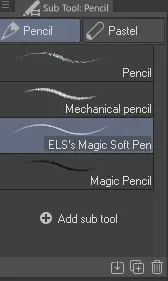
Hotkey: P (2 times)
Use Case: Sketch / Line Art
I'm also a fan of the Pencil tool for line art—I've personally customized my pencil for that very use. It's especially wonderful for those who adore the feel of sketching with a pencil. To access this tool, simply double-tap “P” on your keyboard!
3. Brush

Hotkey: B
Use Case: Painting
The Brush tool is your go-to for painting in Clip Studio Paint. The software's asset store offers a rich variety of both free and premium brushes. If you're just starting out, don't miss our curated list of FREE top brushes for beginners—grab it here!
4. Air Brush
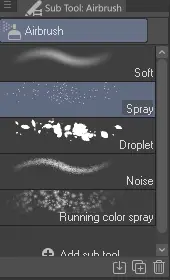
Hotkey: B (2 times)
Use Case: Painting
For those seeking a smoother painting experience, the Airbrush tool is your best bet. This tool category even includes a scatter brush, perfect for creating effects like falling petals, dust particles, and more. Just double press the “B” on your keyboard to access this tool set.
5. Decoration Brush
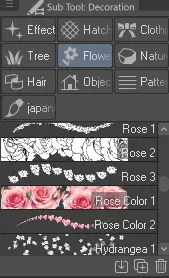
Hotkey: B (3 times)
Use Case: Decoration
The Decoration Brush is one of the most entertaining features in Clip Studio Paint! Think of it as your customizable stamp brush designed to make your art creation easier and faster. Within this category, you'll discover a treasure trove of effect brushes, clothing textures, patterns, and brushes for flowers, leaves, and trees, and a lot more!
Craving more variety? Just visit the Clip Studio Paint asset store to explore fascinating assets created by the talented CSP community.
Step #4: Setup Your Canvas Preset
Creating canvas presets in Clip Studio Paint is a handy way to save your preferred canvas size and format.
You can give your preset a name, and the next time you want to work on an illustration with that specific format, you can easily choose it from your saved preset list. This makes it quicker to set up your canvas for your projects.
To create a preset in Clip Studio Paint, follow these steps: Go to File > New. Specify the canvas width and height as needed, then click ‘Save'.
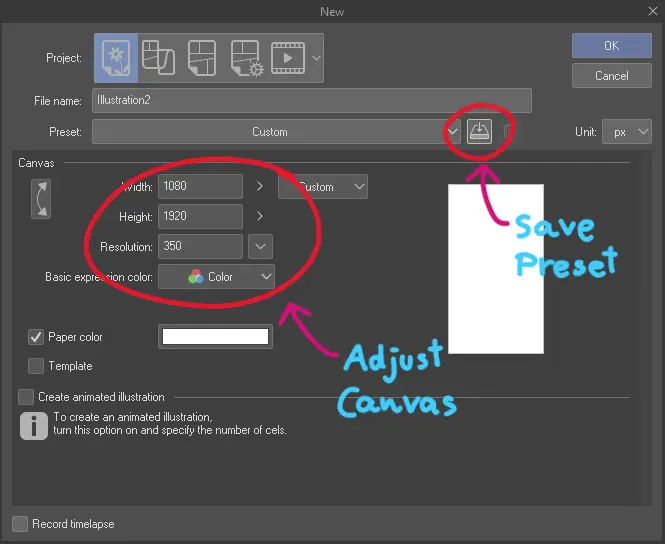
For example, I've saved my own presets like 1080×1920 for Instagram Reels and 1036×1382 for the illustration I created for your client.
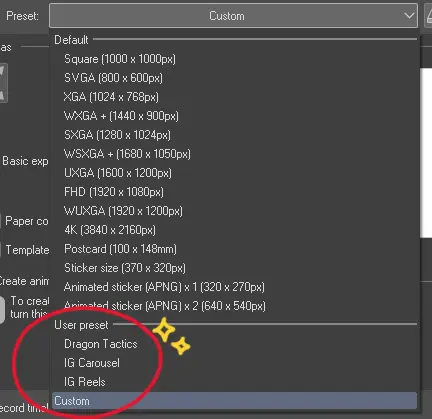
This way, you can quickly access the right canvas format for your various projects.
Step #5: Familiarize Yourself with the Hotkeys and Shortcuts
Once you have everything set up in Clip Studio Paint, it's a good idea to delve into hotkeys and shortcuts to make your work smoother.
I'd like to share some of the hotkeys I frequently use when creating my artwork. You can practice with these hotkeys and shortcuts until they become second nature, helping you work more efficiently in the software.
Essential Clip Studio Paint Hotkeys
B: Brush
B (2 times): Air Brush
B (3 times): Decoration
P: Pen
P (2 times): Pencil
E: Eraser
J: Blend
O: Operation (Select Object)
D: Operation (Select Layer)
G: Gradient
G (2 times): Fill
K: Move Layer
M: Marquee
U: Figure
Essential Clip Studio Paint Shortcuts
Ctrl/Cmd+Z: Undo
Ctrl/Cmd+Shift+Z: Redo
Ctrl/Cmd+A: Select all
Ctrl/Cmd+D: Deselect
Ctrl/Cmd+C: Copy
Ctrl/Cmd+V: Paste
Ctrl/Cmd+J: Duplicate layer
Ctrl/Cmd+T: Transform
Ctrl/Cmd+Z: Undo
Ctrl/Cmd+B: Color balance
Ctrl/Cmd+U: Hue/Saturation/Luminosity
Ctrl/Cmd+L: Level correction
Ctrl/Cmd+R: Show ruler
Ctrl/Cmd+I: Invert color
Conclusion: That's All of the Quick-Start for CSP!
And there you have it, your quick-start guide to dive right into Clip Studio Paint!
From mastering pen pressure settings to customizing your workspace and exploring versatile drawing tools, these five steps will equip you with the skills you need to bring your anime art imagination to life.
As we discussed last week, solid basic skills are the foundation for any artist.
With today's deep dive into Clip Studio Paint, you're not just leveling up but you're setting yourself on a trajectory for your artistic mission. 🎨✨
Stay tuned for the next article, where we'll dig a little bit deeper into Clip Studio Paint: 5 CSP tools to 2X your art process!
Finally, if you like art tips and content like this, feel free to subscribe to my weekly newsletter
I share my anime art tips and experiences in my digital art career in a weekly email. You'll get the insight and behind the scene of the art career! Really recommend if you're a beginner anime style artist.
Thank you so much for reading this post! I really appreciate your visiting and using your valuable time reading my content!
Much Love 💖

Want to know how to start your anime art journey?
Download my ANIME ART STARTER GUIDE and start your artistic path right away for FREE!