


Let's face it: even for artists, designing anything is a time-consuming task…
To be honest, even though I enjoy sketching and creating, I get tired with the same old design process.
Another issue with design is that it may be really tough to create anything unique and it takes you so long to make a variation of any design collections.
However, AI can assist you with this process. You may also utilize the AI to generate a large number of well-designed items in a matter of seconds.
That is why we are here today. To assist you in better designing process using NovelAI, as well as to give a step-by-step instruction on how to improve the outcomes from your prompts.
OK, let's get started!
🎉 AI PROMPT VAULT for ANIME ARTIST !
Let's access a Notion document where I share all of my AI generated images with all the “prompts” I used to create them!
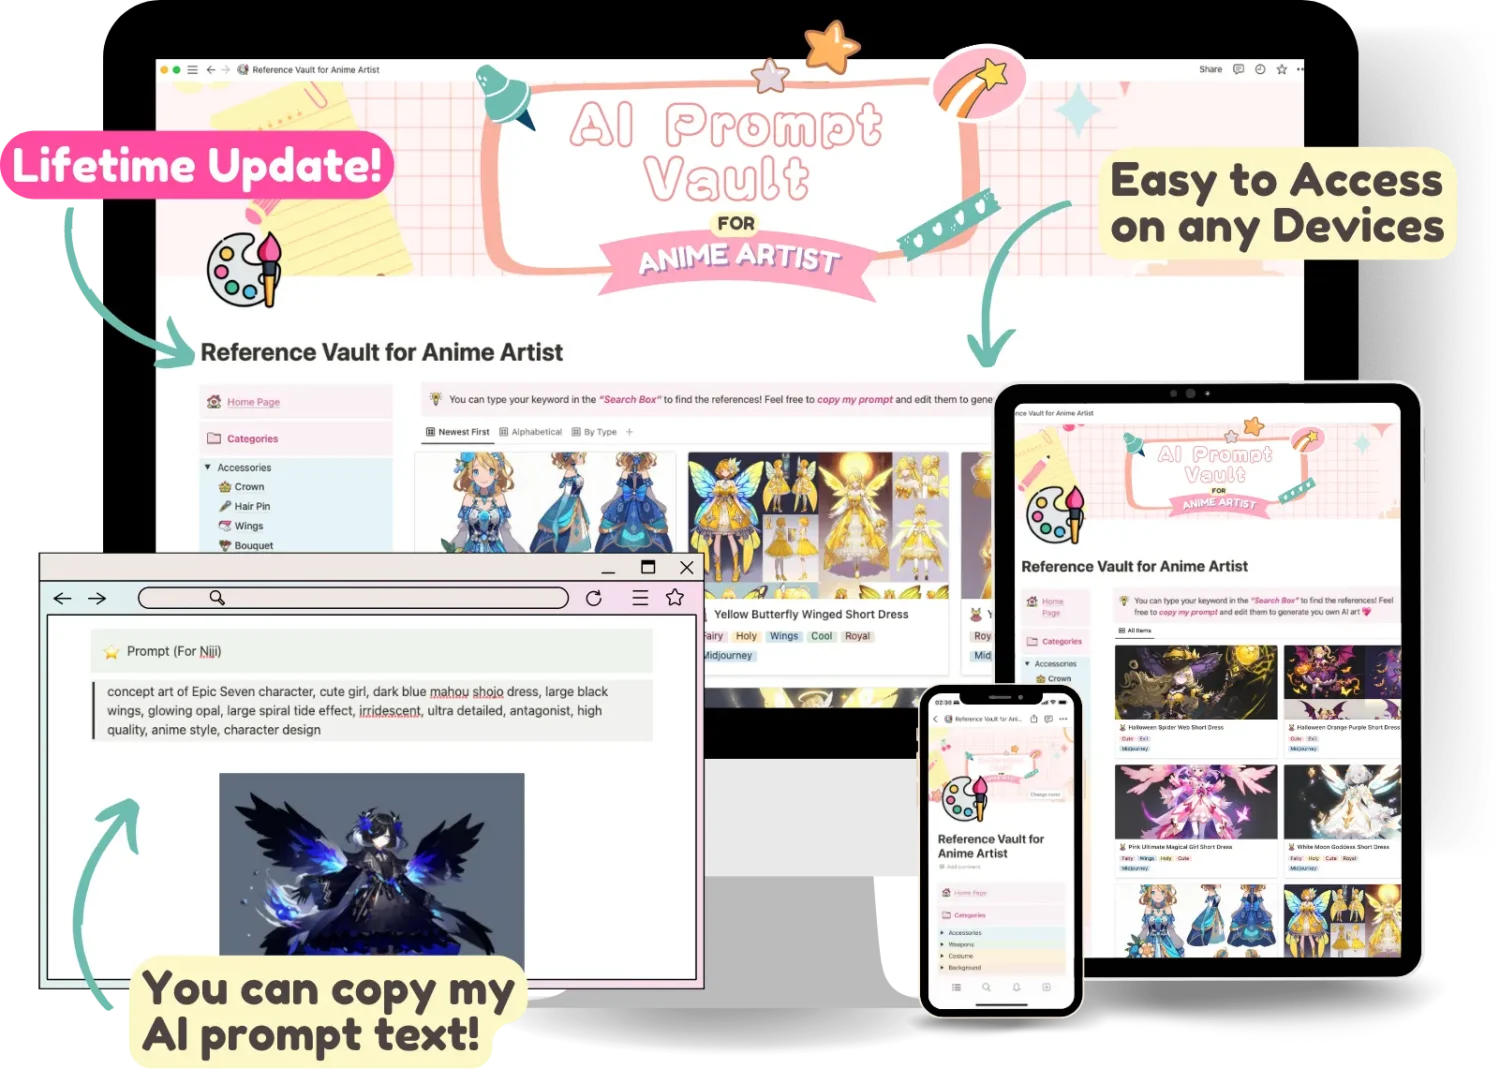
Unleash your inspiration with these Midjourney AI prompts! With over 100+ curated prompts, you'll have all the inspiration you need to fire up your creative process. Plus, with our constantly updating prompts and recommended keywords, you'll never run out of ideas. And for a limited time, get access to all of this for just $5 before the price goes up! Click here to access now.

What's NovelAI and what you should know about it?

Novel AI is a text-to-image platform that provides AI-based service to generate images using Stable Diffusion (SD). The algorithms will generate images on user input by employing artificial intelligence to create art from data sets. You can just simply provide a text prompt stating the artwork you want and let the AI generate an image from it.
NovelAI is also the market’s most powerful AI for generating anime-style images. Initially, Novel AI simply had an AI function to assist you with novel writing, but they have just introduced their image generating.
To use Novel AI, you must pay at least 10 USD each month. They don't have a trial version for the AI image generator yet. Actually, there are also various subscription payment plans available and you may read more about the Novel AI and its potential on this blog.

If you want to use the AI for FREE, you may consider installing Stable Diffusion (SD) on your computer. You can use the same function in SD. However, you may need a bit decent GPU to run it smoothly.
In addition to a text-to-image function, NovelAI also has an image-to-image function, which I'll explain in greater detail in the topic below.
FYI: There are many controversies surrounding NovelAI since many people have accused them of using illustrations to do machine learning without the artists’ permission. AI-generated images and copyright are complicated issues and are continuously being debated on the internet. As a result, you may use it at your own risk.
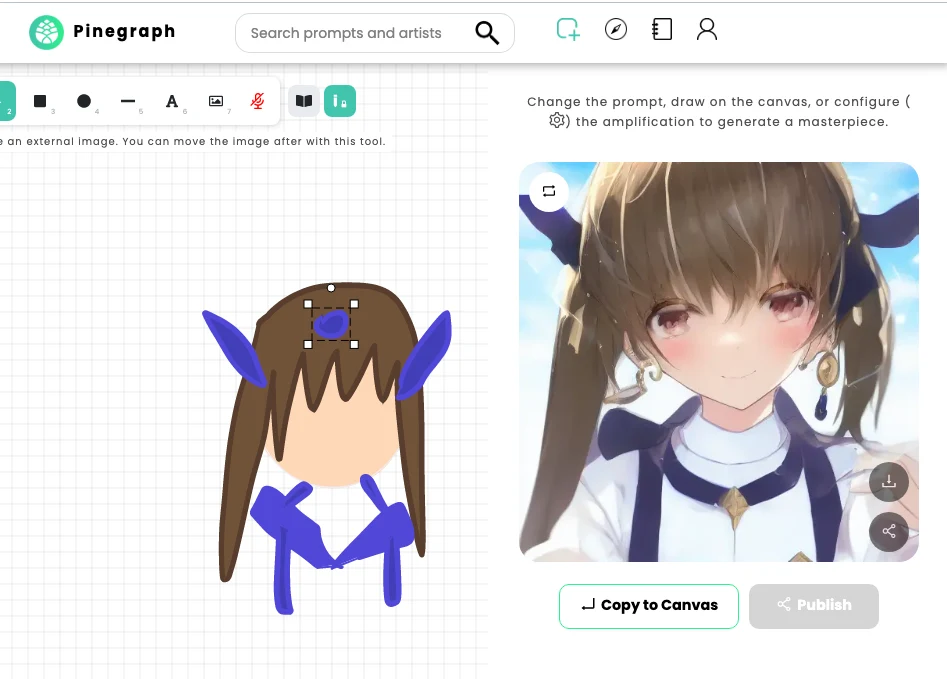
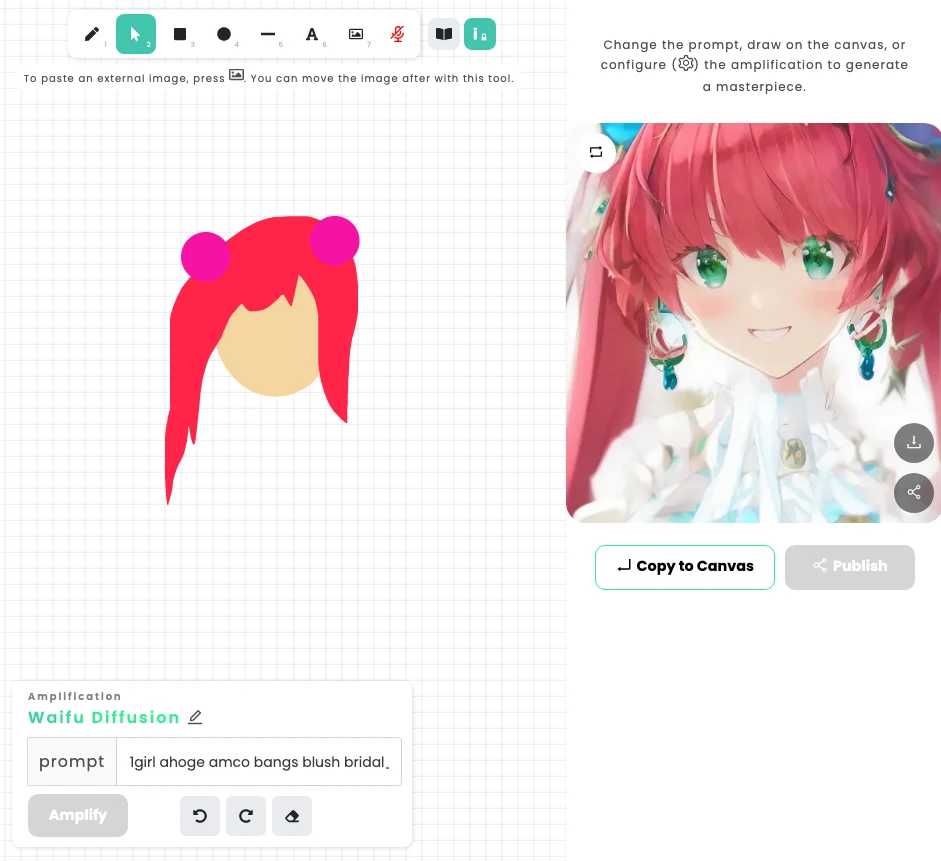
What's image-to-image function in NovelAI and how can it help artists?
Image from NovelAI document
Image to image (Img2Img) is a type of AI function that automatically creates high-quality images from low-quality images.
It can be used for both artistic and scientific purposes. Img2Img algorithms can create images by synthesizing the characteristics of multiple images, such as color and lighting, that are similar to an input picture.
The free AI platform named Pinegraph also have this function since it's also base on Stable Diffusion and Disco Diffusion.
The goal of Img2Img is to automate the process of creating images so that humans do not have to do it manually. Plus it is a way to automatically extract and recognize patterns and objects in one image to generate a new image with a different set of patterns.
Is this sound familiar?
It's the same as our drawing process. We start our drawing with sketching process, then base coloring process, and end up with the polishing process.
The difference is that AI can complete these tasks in a few seconds! And I'll show you how to utilize this function to improve your creative process, artwork quality, and save a lot of time!
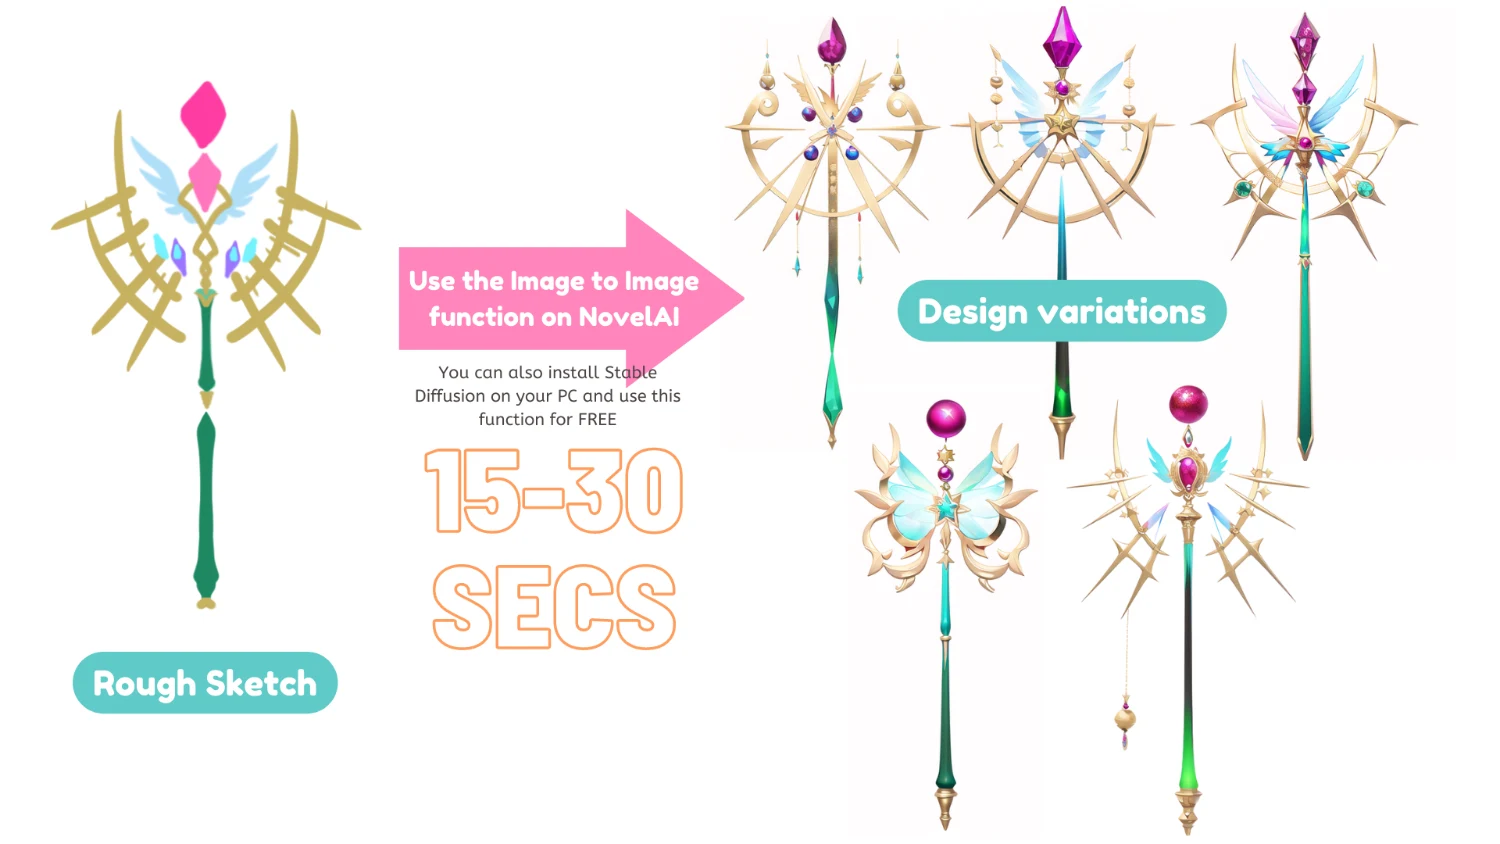
This will help concept artist and designer A LOT! It means that the AI can create a new image by using the source image as its template.
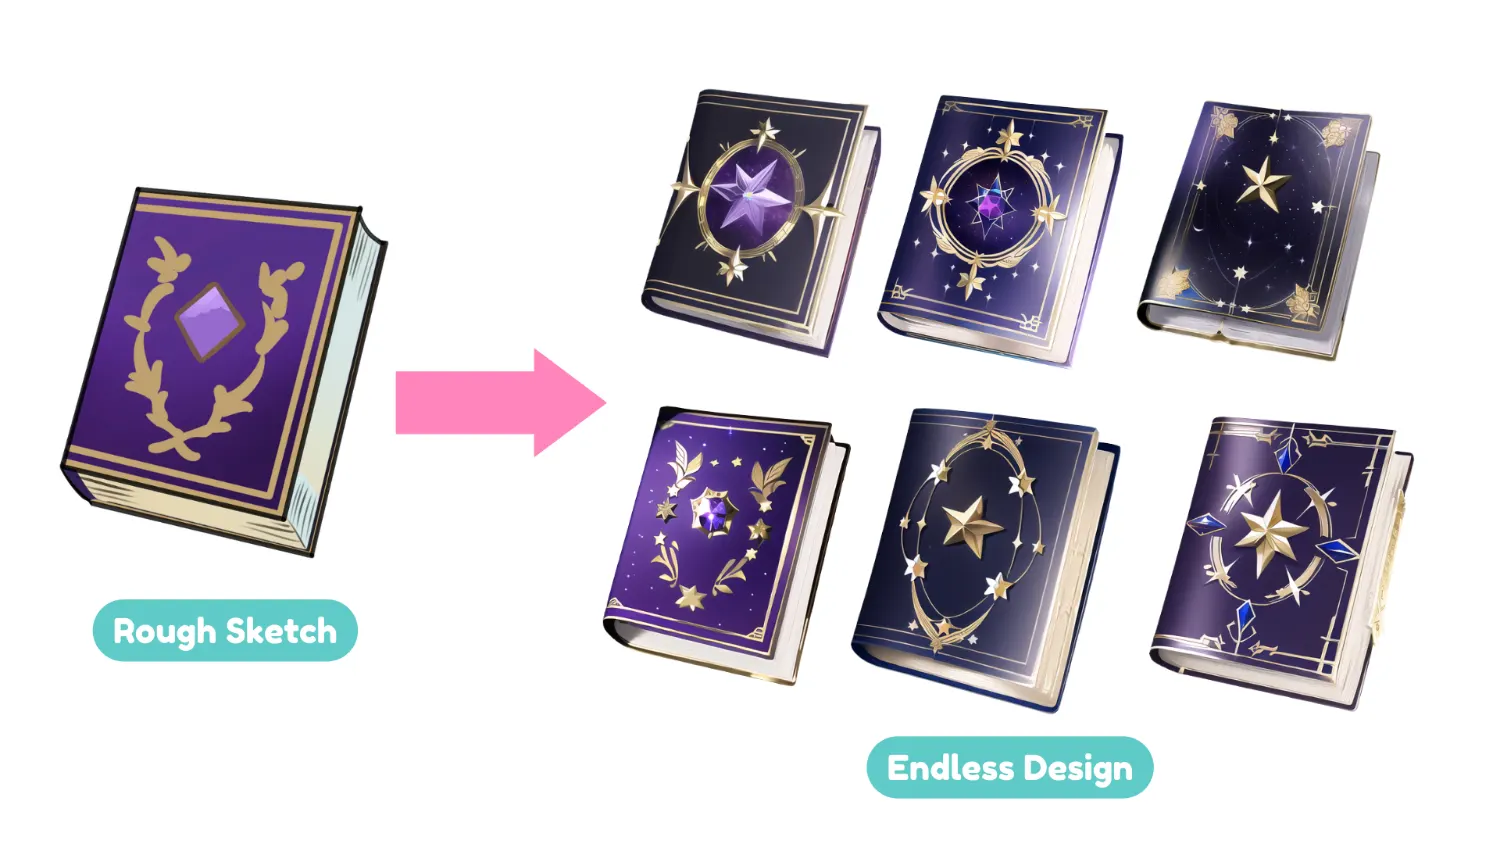
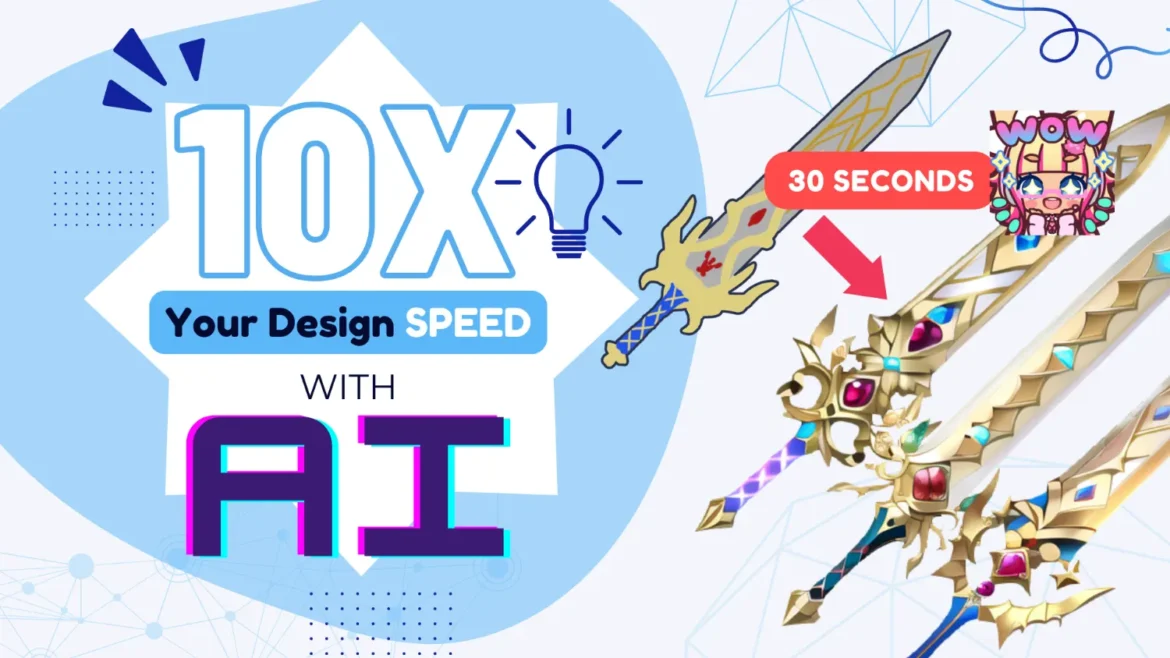
You'll be able to create a whole bunch of items in less than a minute after you've mastered this technique! This process will be useful when you're working in a game project or any projects which you have to design tons and tons of items such as, weapons, garments, accessories, and many more!
Understanding the brief steps of using image to image function with your artwork
OK, let me quickly explain our process. Don't worry if you're unfamiliar with the AI! Let's read these processes so you can comprehend them quickly.
- Make a rough drawing of your assets or items.
- Color it roughly.
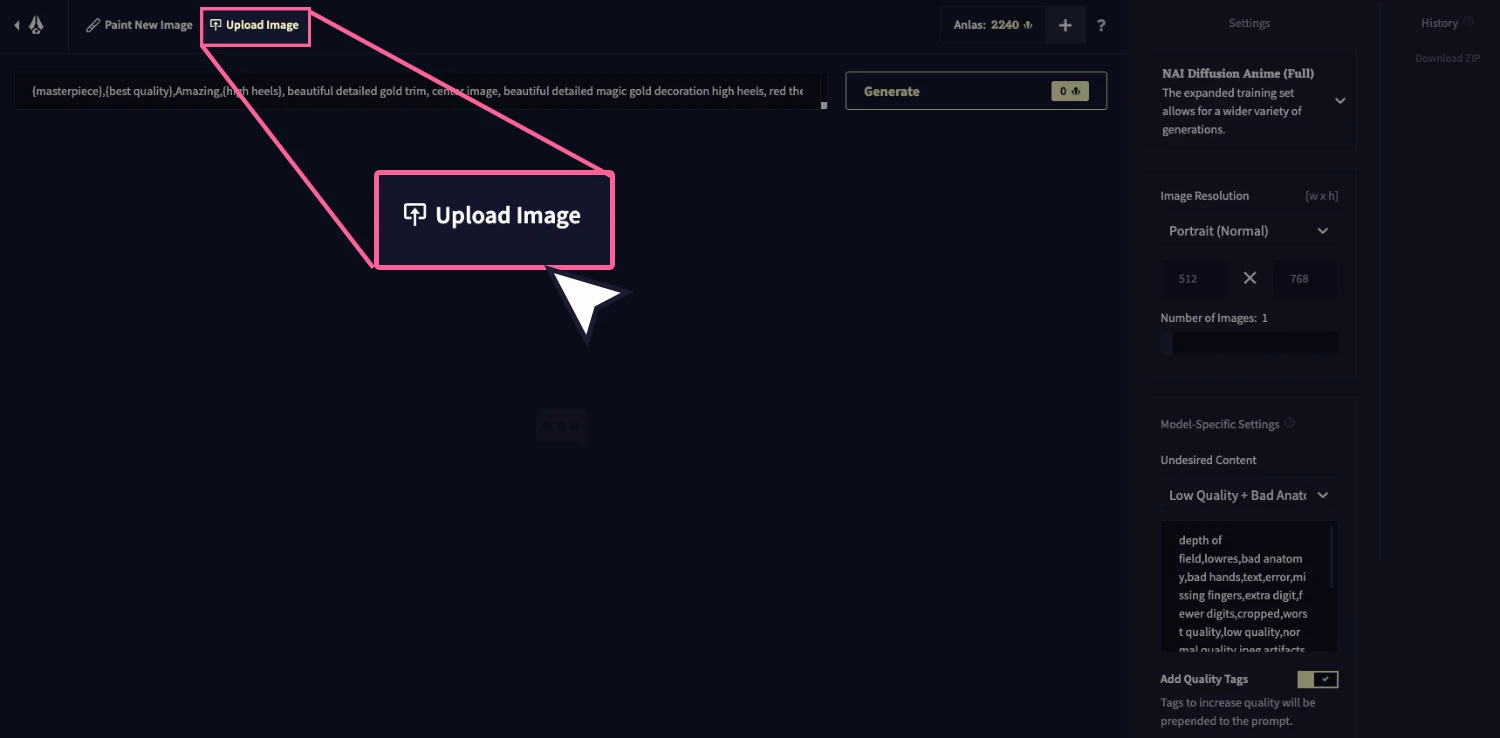
- Upload it to Novel AI.
- Use the uploaded image as a source and use the text prompt to generate the new image.
OK! You now understand how to utilize the image to image function. Next, I'll go through each step in detail, and you may follow my instructions step by step.
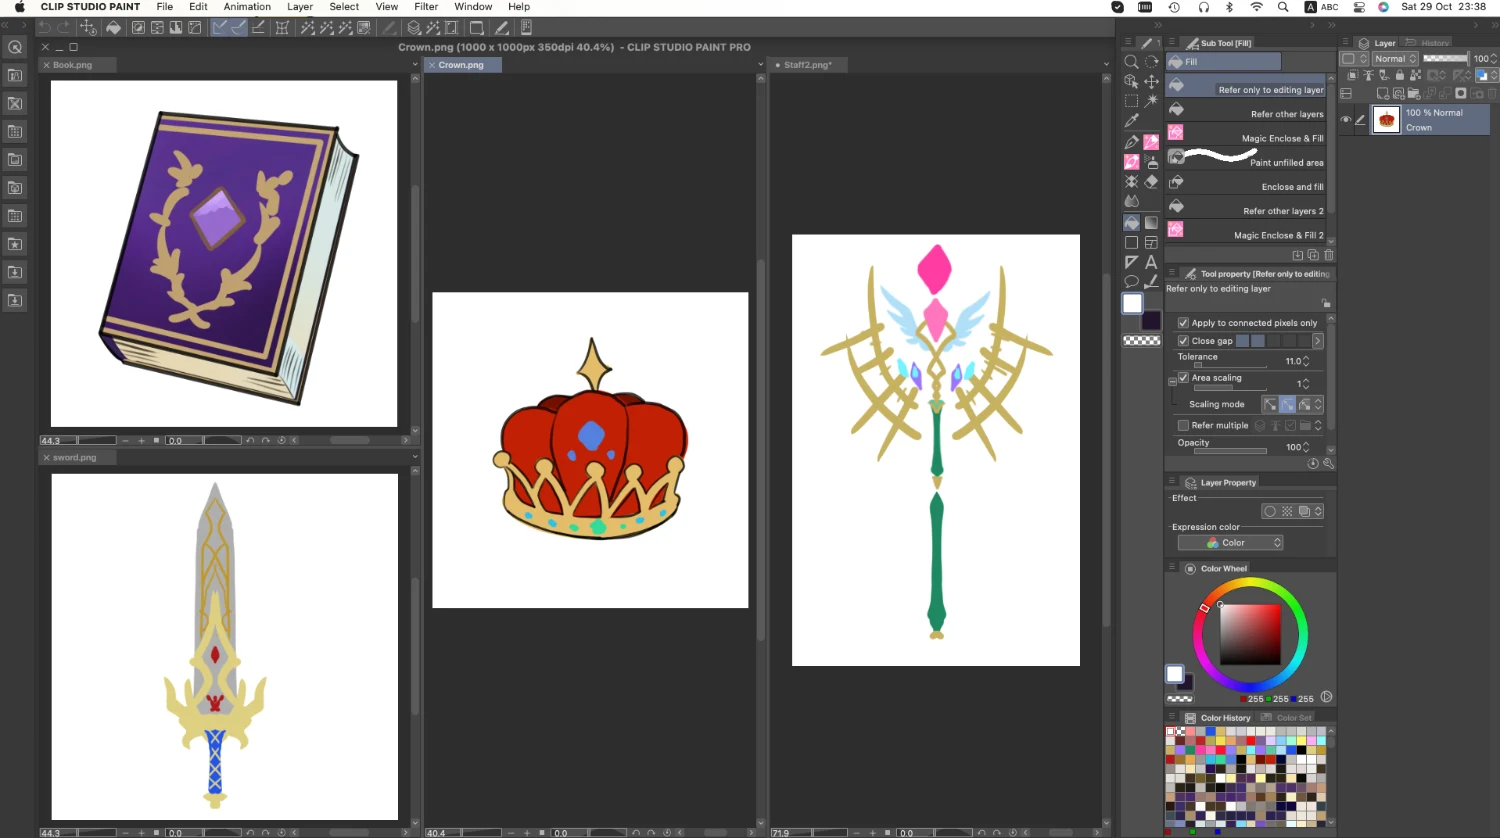
Let's start the first step: Design your item roughly in Clip Studio Paint
In this step, I'll design my own assets using Clip Studio Paint. You can use your preferred drawing software to do this. I just use CSP since it's my favorite drawing software
I recommend using a square canvas. Hence, it'll a basic ratio for game item artworks. (I use 1,000 x 1,000 pixel size at 350 dpi resolution.)
No need to add any complex details in this process. You may see from the image below that I just draw the rough outline and color silhouette. You can make various style as you want since this process takes so little time.
MiMi TIPS: You may use a 3D model as your base for designing, or you can create your own item templates to reuse when creating new designs.
Save and upload your item image to NovelAI
After finish your rough drawing, save the image in .JPG or .PNG and upload it to NovelAI.
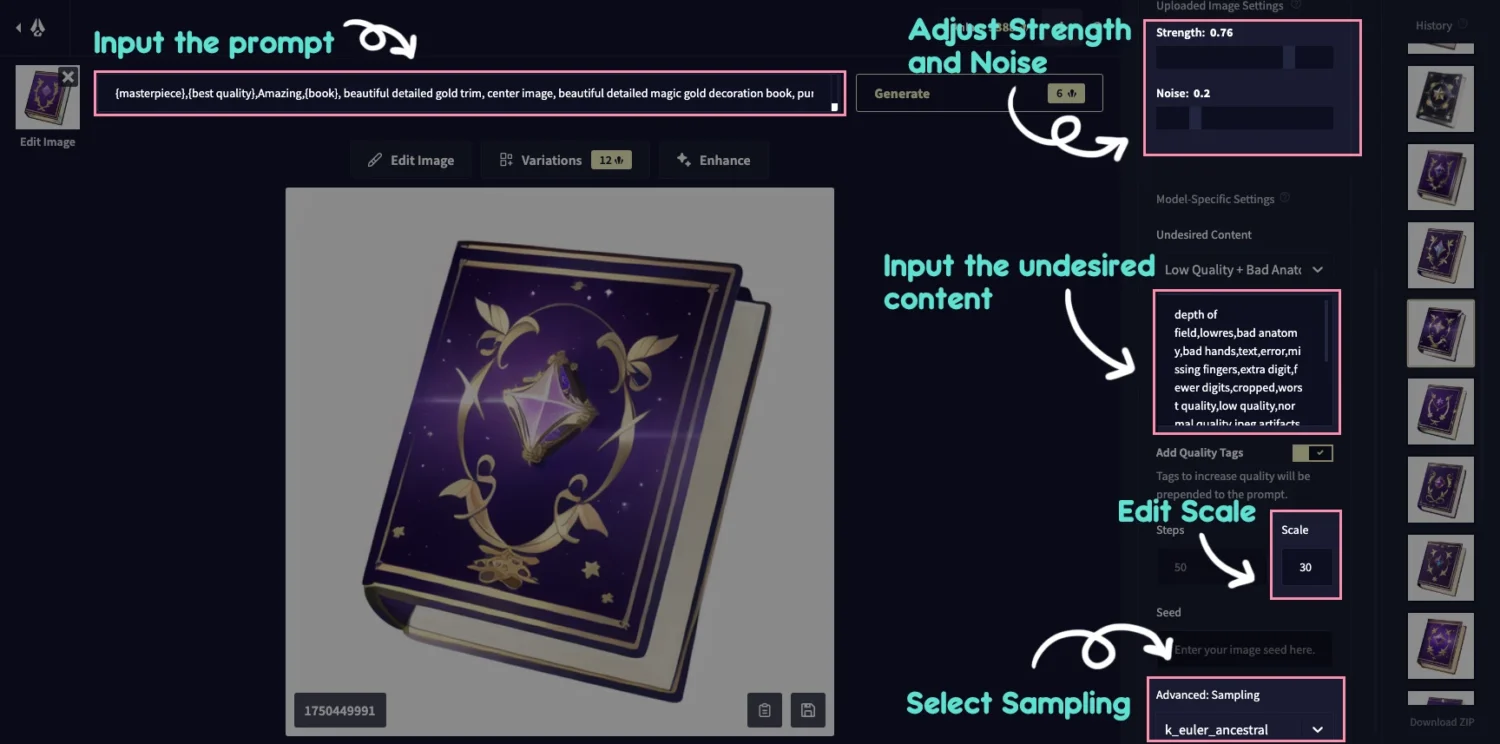
Next, input the prompt and adjust the settings then generate the image.
This process will cost you about 2-10 Anlas (credit for image generating on NovelAI) If you want to do this for free, you can consider installing Stable Diffusion on your pc instead of using Novel AI.
Recommended NovelAI prompt and settings to create your item artwork
First, I'll share the prompt I used so you can use it as a guide to generate the images. I've tried various prompt and here is the recommended prompt set you can use to generate yours.
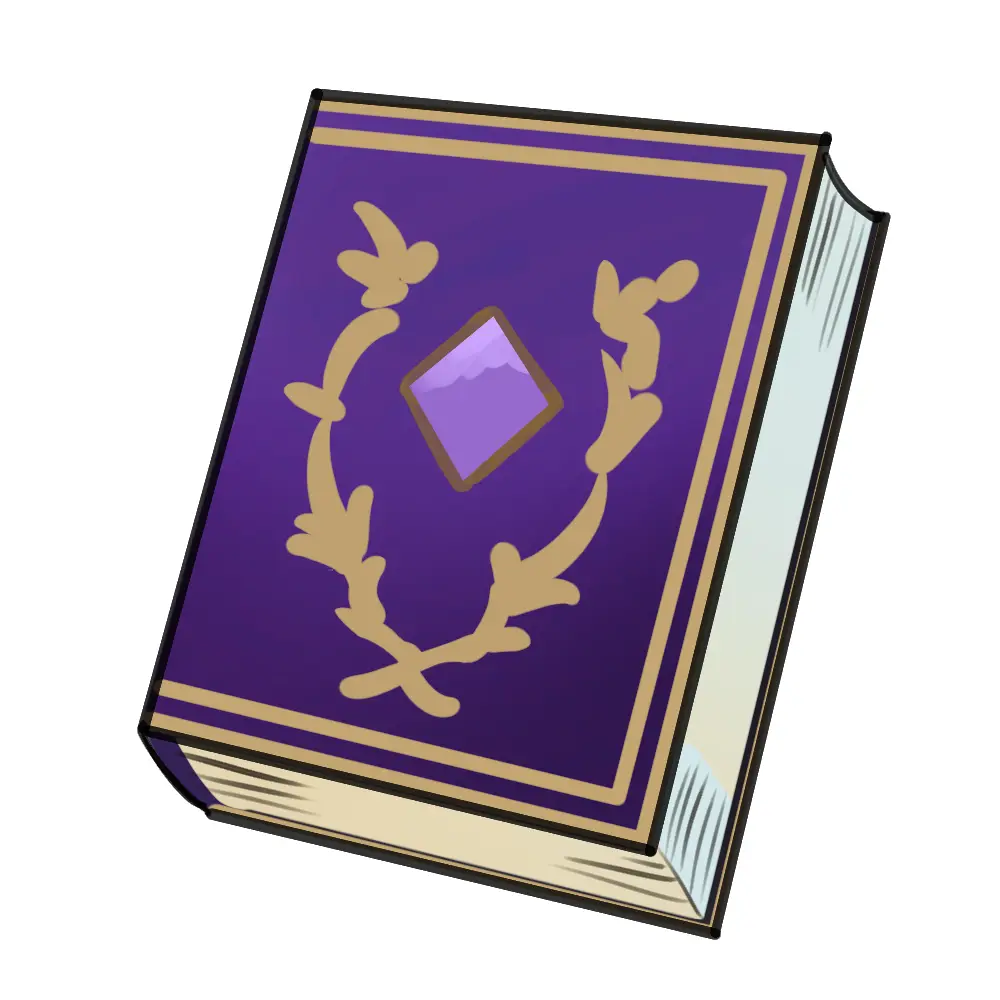
Prompt: {masterpiece},{best quality},Amazing,{beautiful detailed magic gold decoration INSERT YOUR ITEM NAME HERE}, beautiful detailed gold trim, center image, purple theme, octane render, gold ornament, iridescent
Settings: Other settings can be varied. From my experience, it depends on the items. However, I'll share the setting that is OK for me, but you may have to fine tune the setting by yourself a little bit. I'm still learning about these parameters and will write about them later.
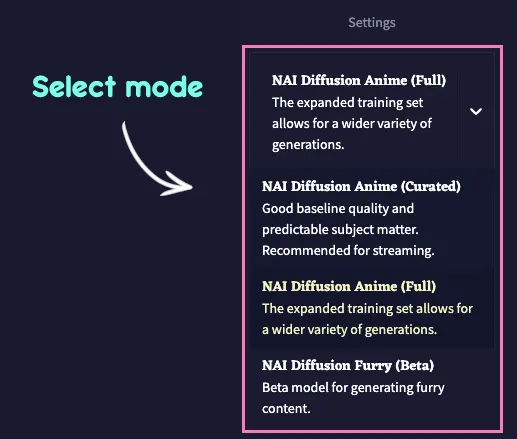
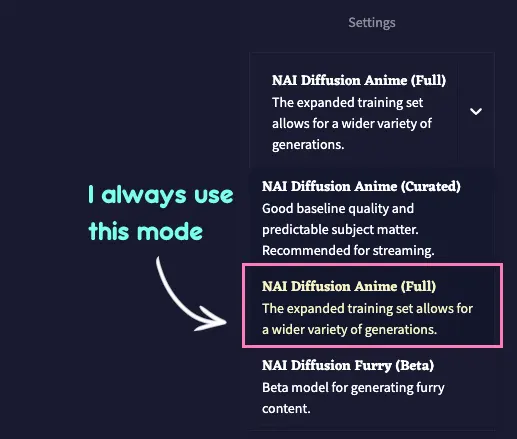
Mode: NAI Diffusion Anime (Full)
Strength: 0.7
Noise: 0.2
Undesired Content: depth of field, lowres, text, error, extra digit, fewer digits, cropped, worst quality, low quality, normal quality, jpeg artifacts, signature, watermark, username, blurry
Scale: Between 11-25
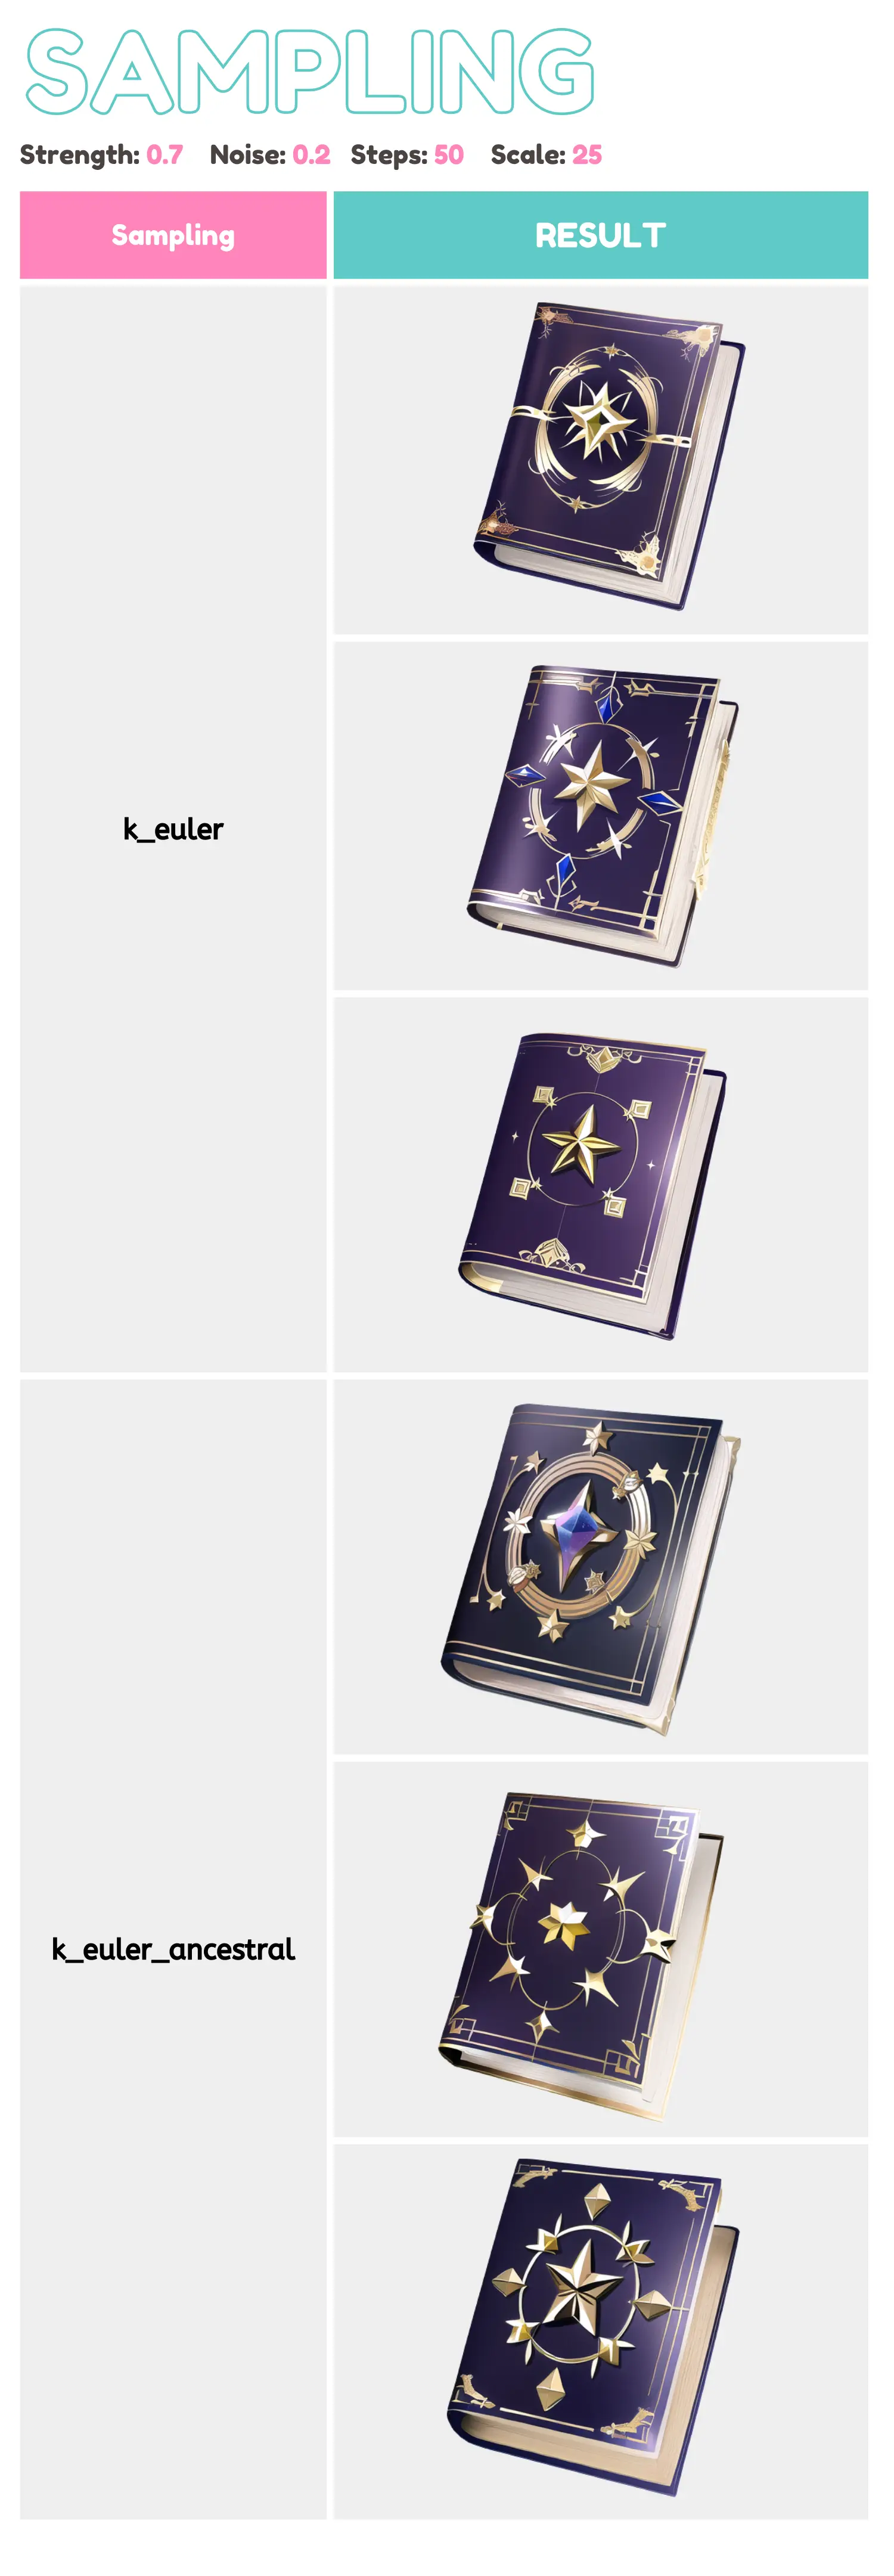
Sampling: k_euler or k_euler_ancestral
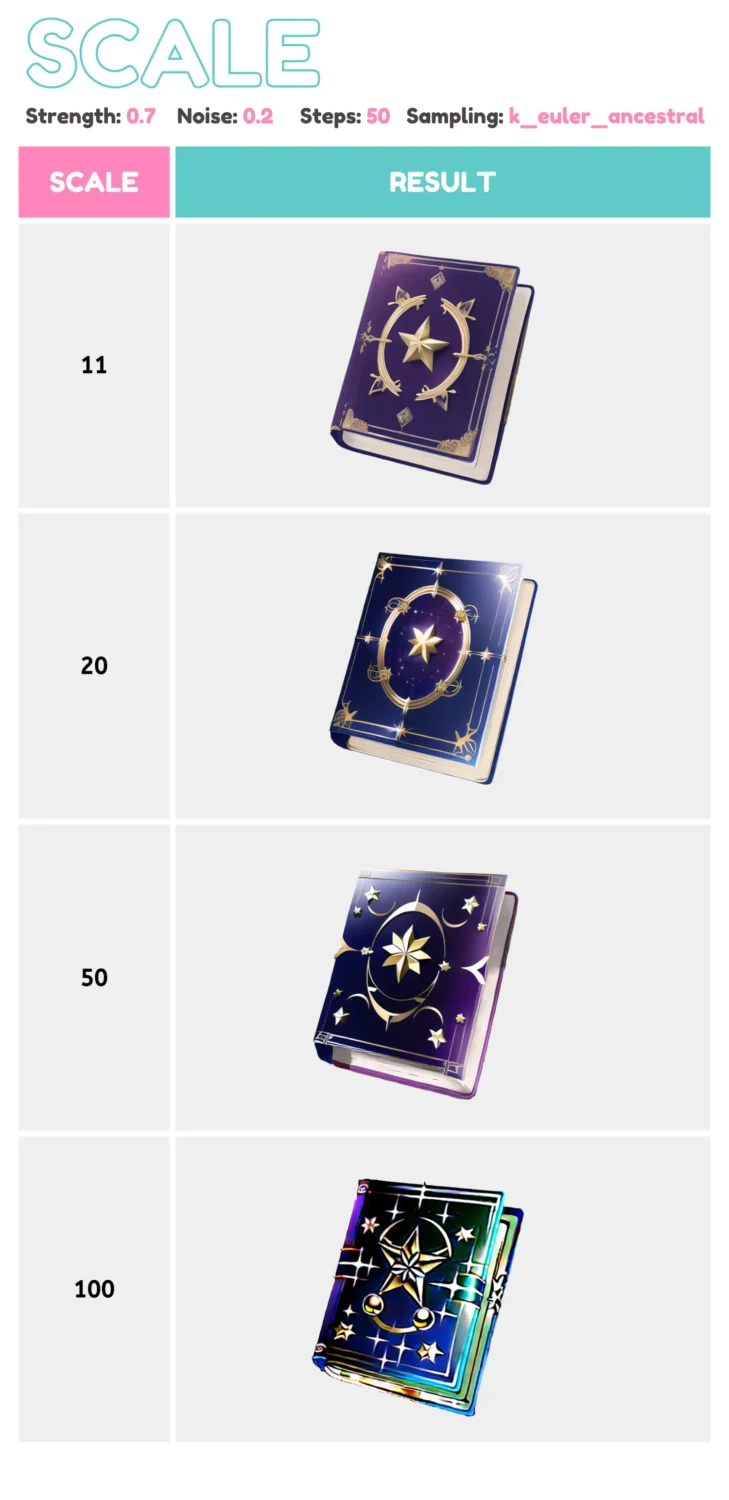
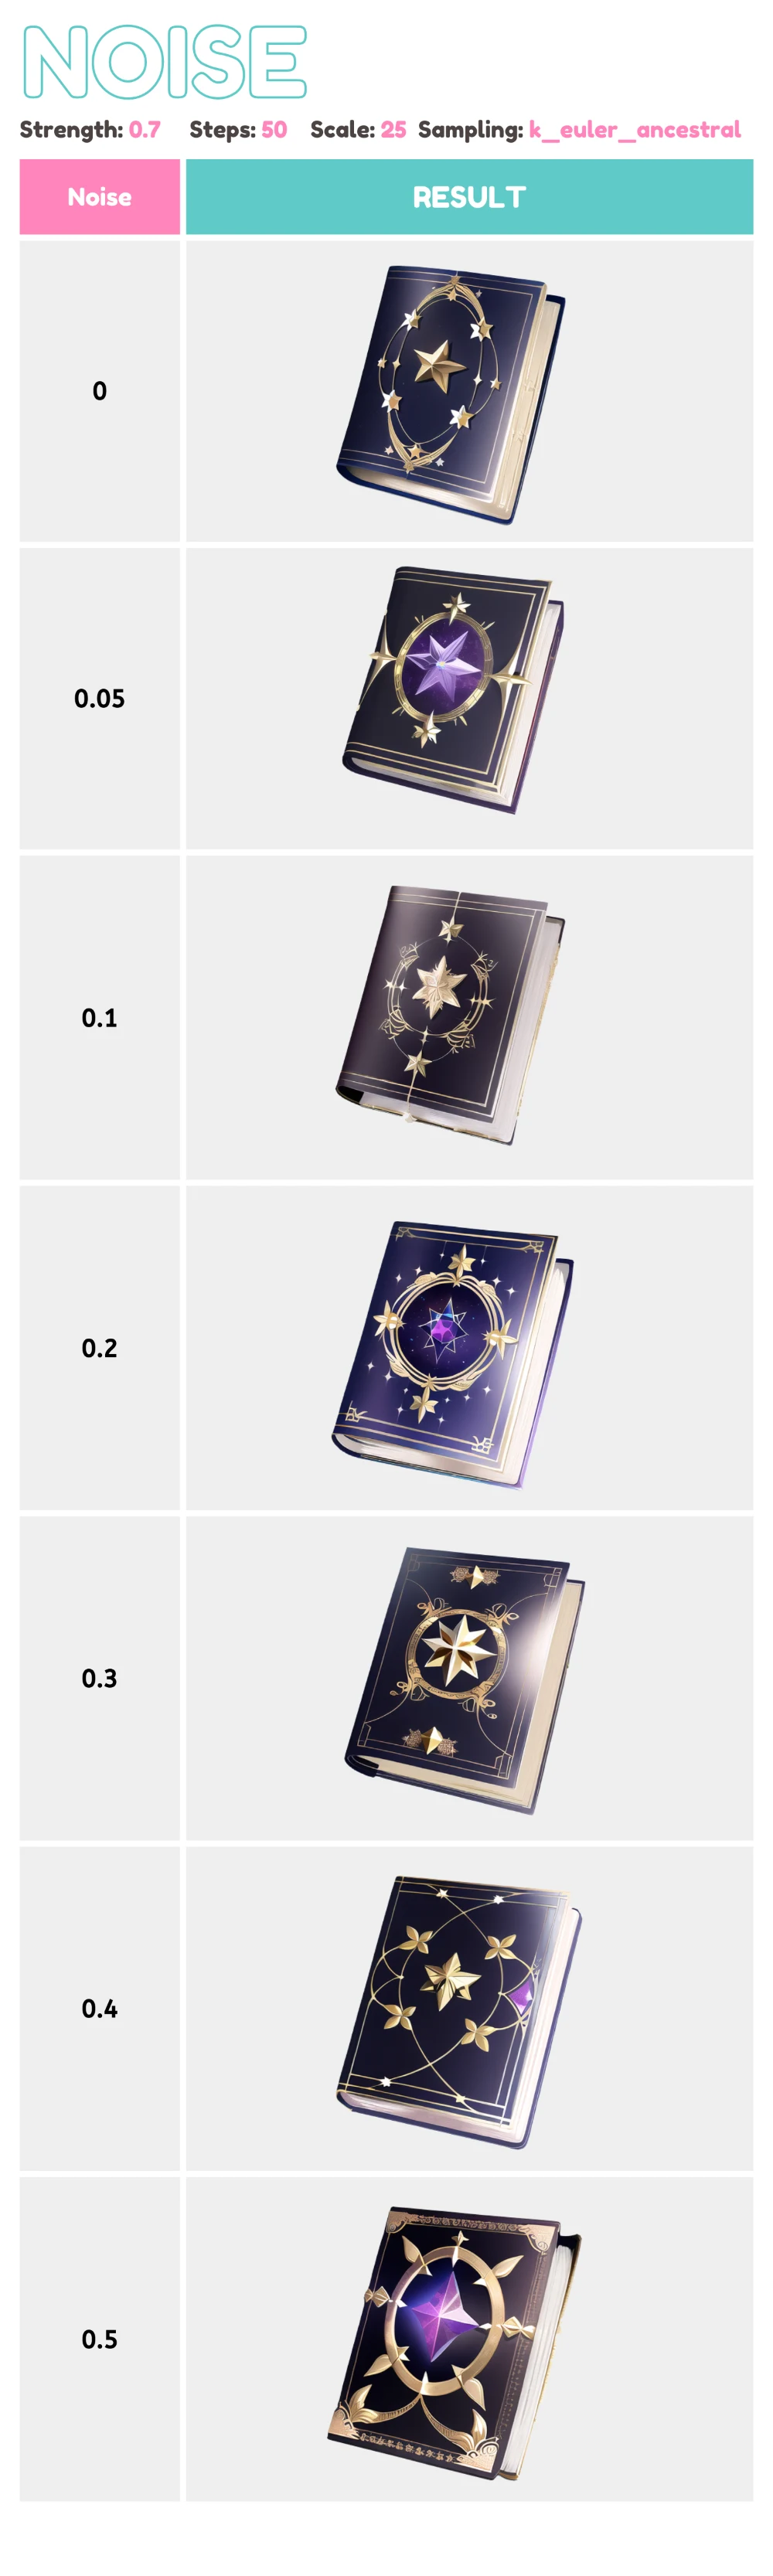
I've record the result from various settings and you can view it here. This is the source image I use to generate this set.
First, I'll choose the mode to generate. As fas as I see from the result I think the NAI Diffusion Anime (Full) gave me better results.
The first parameter is Step. When using Img2Img function in NovelAI, I can't adjust the Step parameter. As I read on NovelAI document, Step is the number of iterations the AI should refine from the initial creation of your prompt. However, Step was fixed at 50 when I use Img2Img.
The next parameter is Scale. From the NovelAI doc, the Scale parameter defines how aggressively the AI will respond to your prompt. A higher number can assist the AI stay closer to the main intent of your text prompt, but setting it too high may have the opposite effect.
The Scale value can sometimes be used to change how refined and powerful the effect is: a lower Scale value can be more painterly and softer, while a higher Scale value delivers more fine detail and sharpness. You may see that, the more Scale I add the more contrast there will be.
Next, Strength. It enables the AI to alter the visual composition. Lower Strength will provide results that are more similar to the original. If you adjust the strength too much, the outcome will be a lot different from the source.

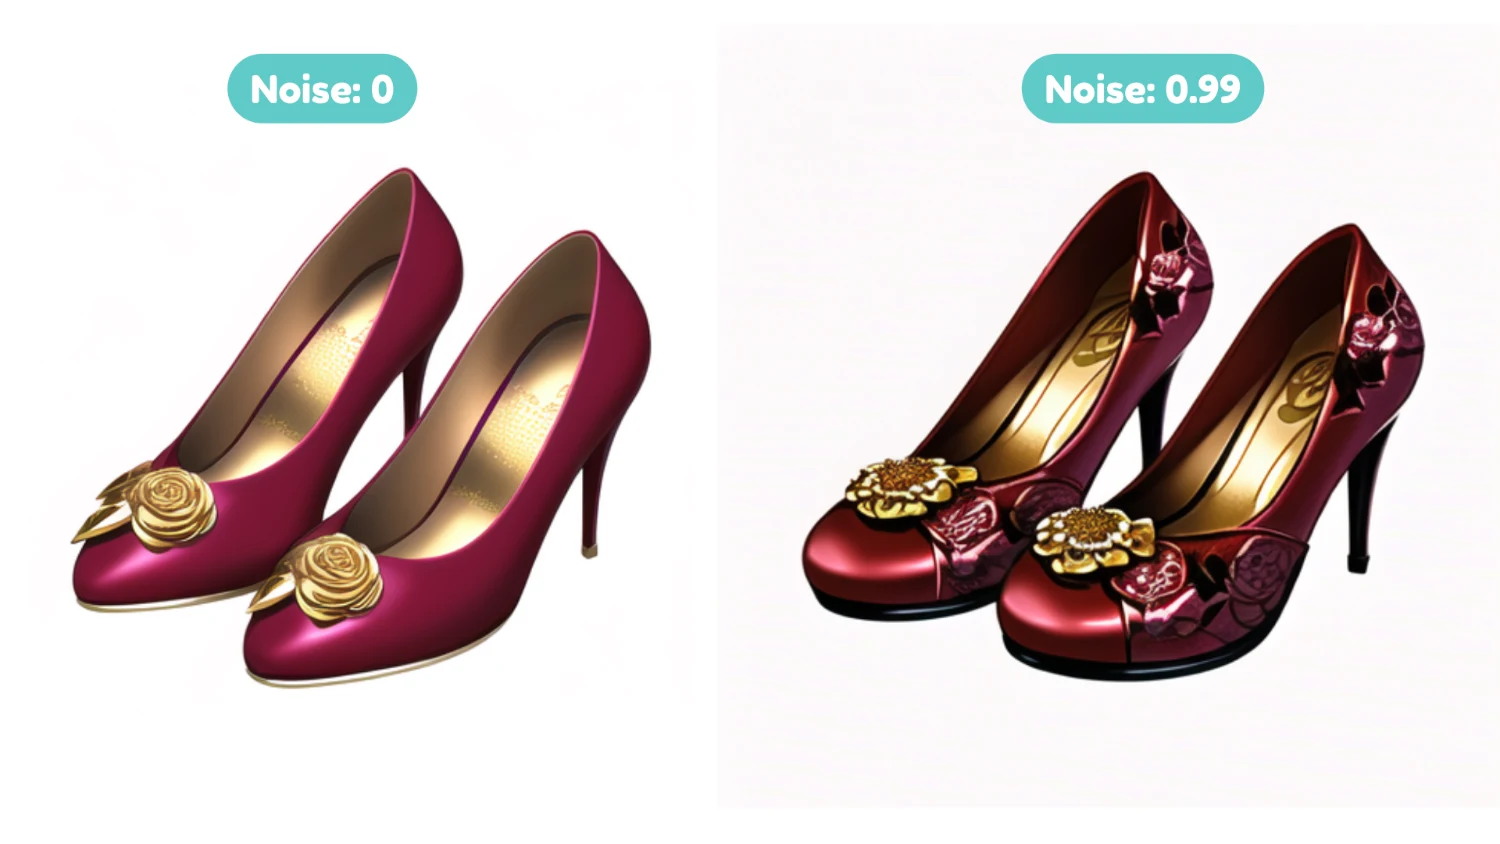
The next parameter is Noise. It may help the AI to produce additional details, but if set too high, it may create weird artifacts. When I adjust more noise, the result I get is darker and blurry.
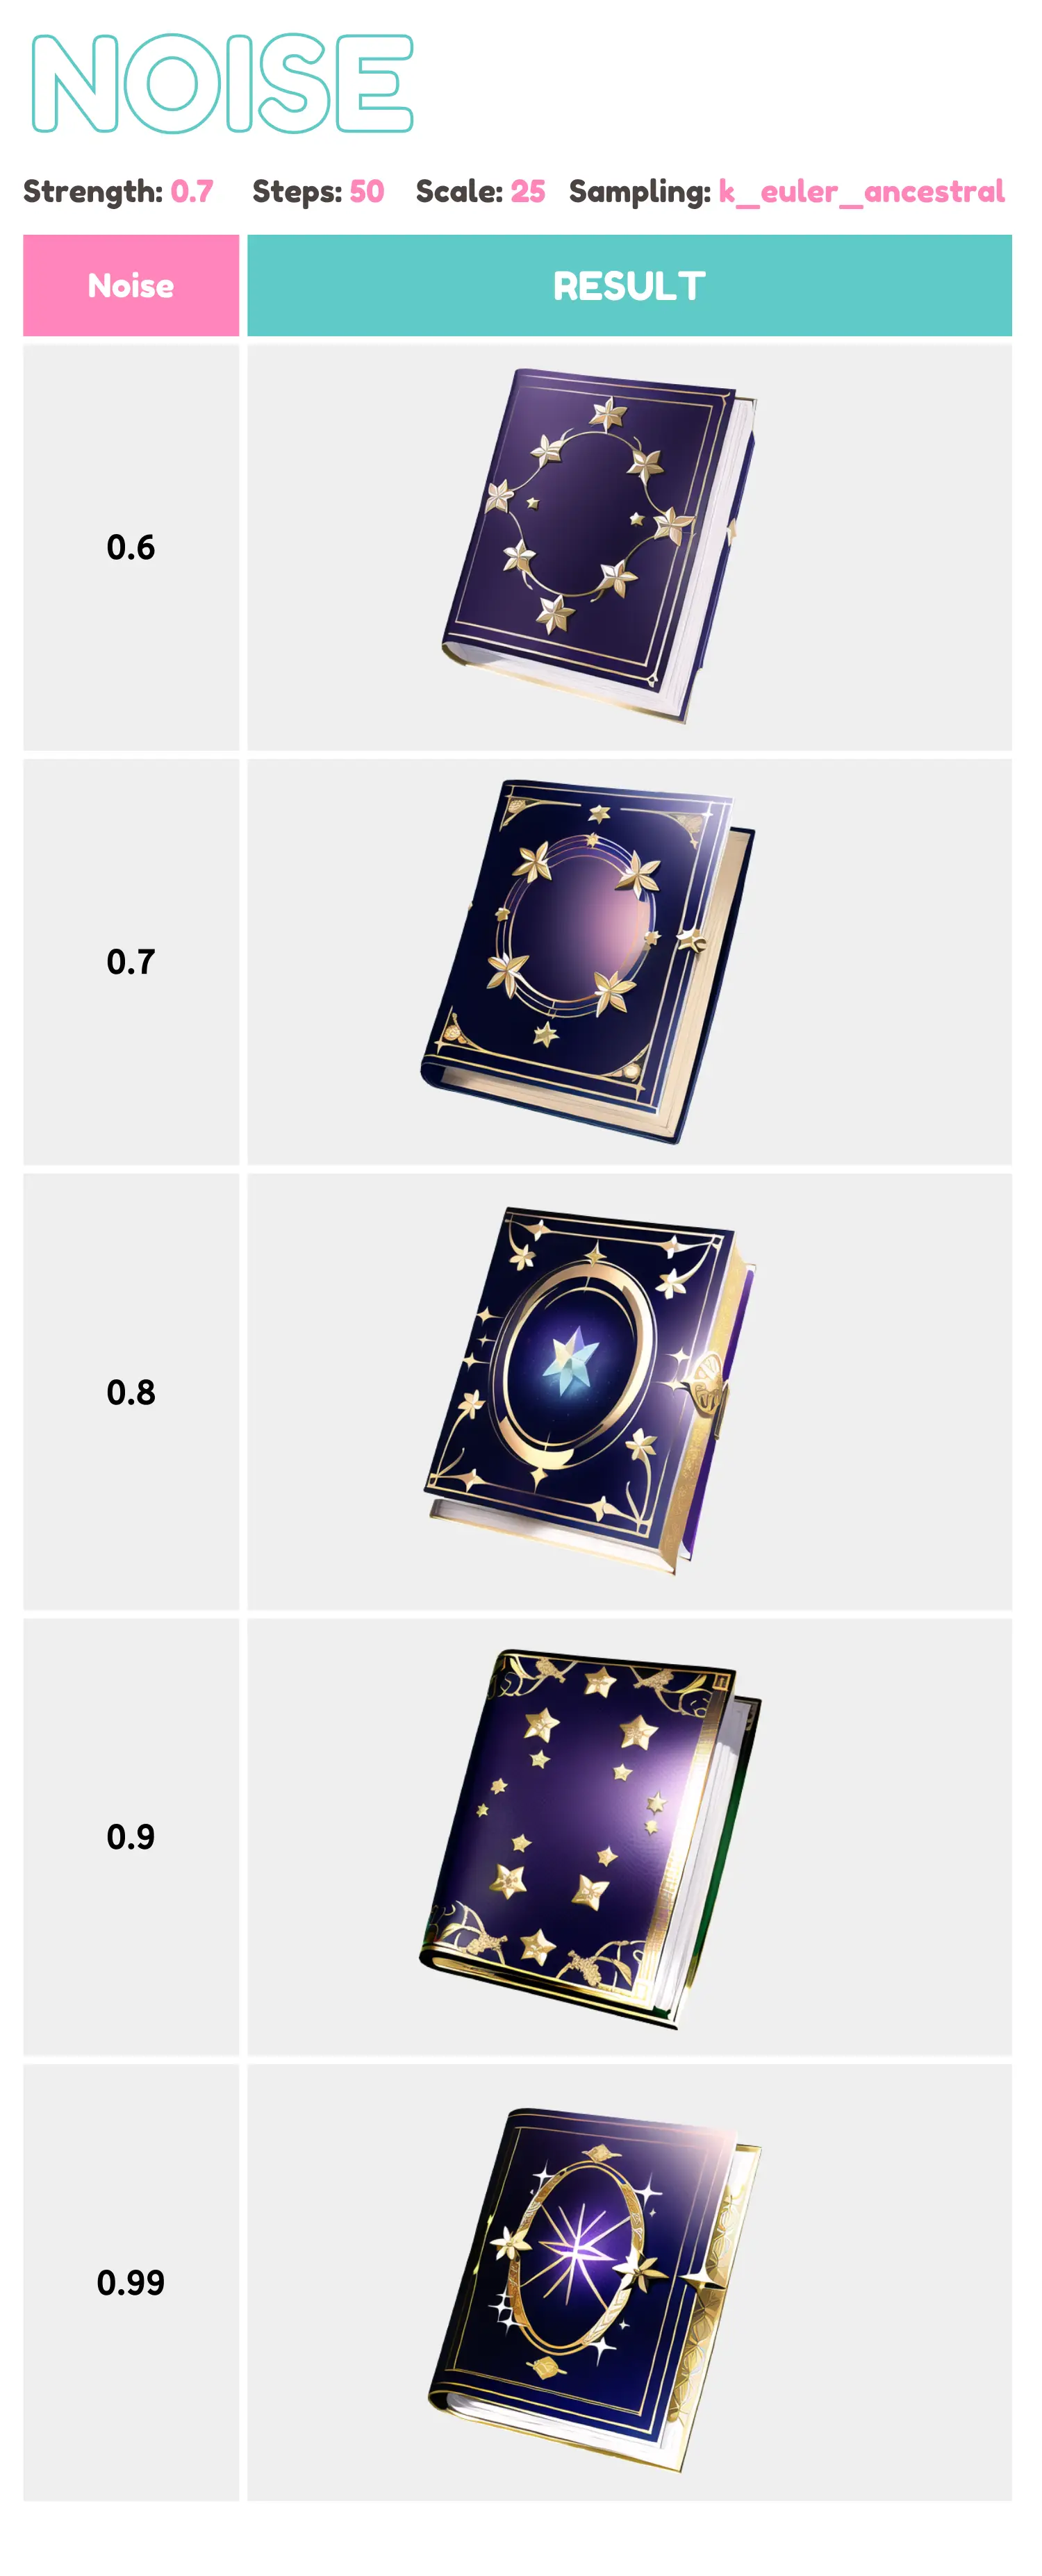
The last one is Sampling. Different sampling modes can produce different results on the same prompt at different step levels. In this case I prefer k_euler and k_euler_ancestral
Additional tips to create various style of items
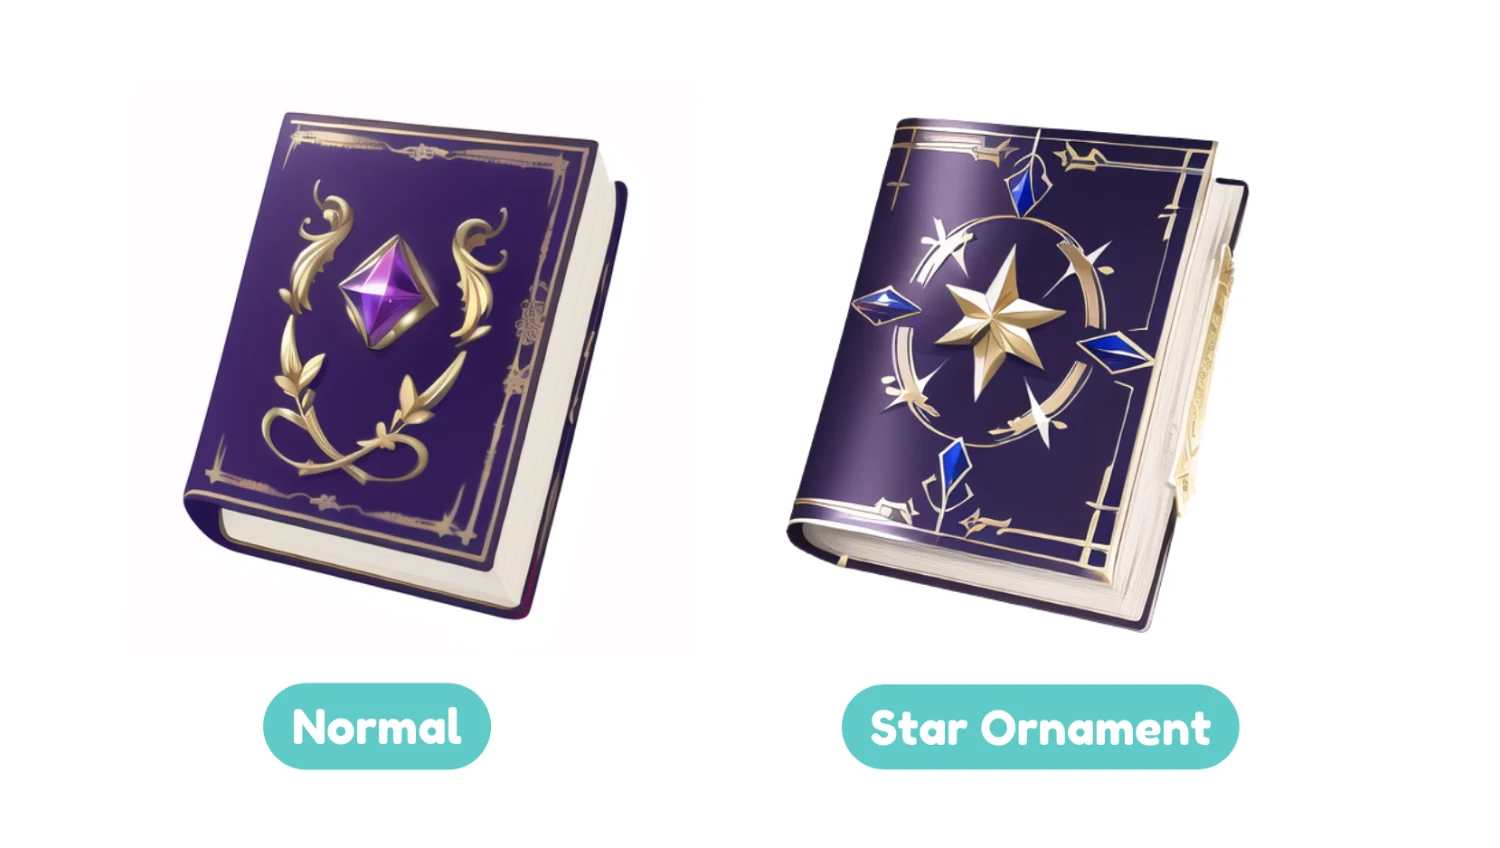
You may change the prompt, add extra styling, and use tags to change the look of your item. For example, you may utilize the names of various games to guide the artwork style. You may modify the color of the objects as well as the details by changing the prompt.
For example, when I added the tag “star ornament”, the decoration will be changed to the star shape.
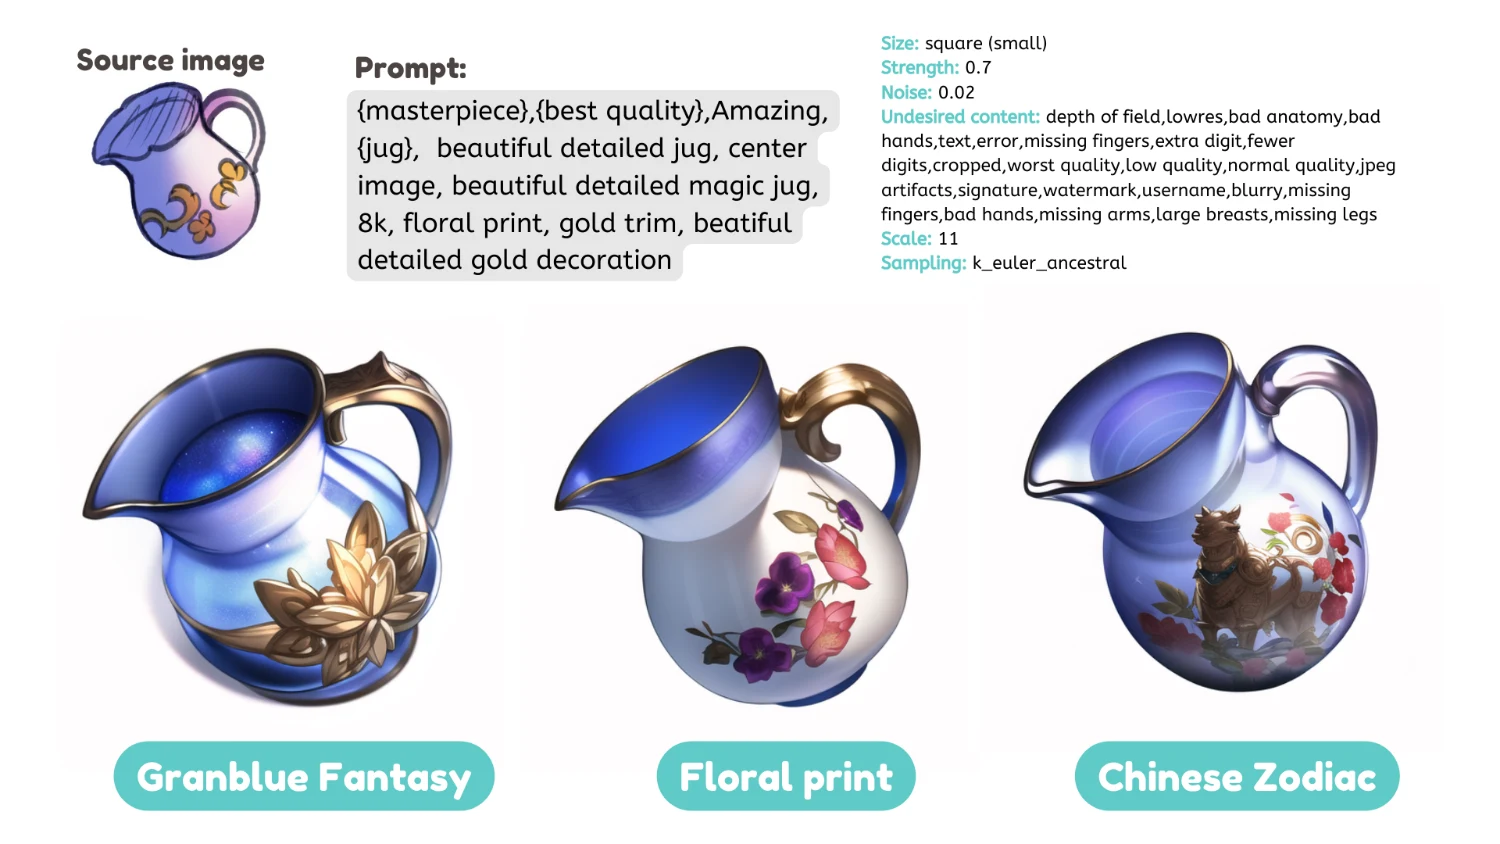
You can use the simple shape silhouette and 3D model as a source image!
I experimented with a simple shape and 3D model in CSP as a source, and the outcome is fantastic! You may try this method as well!

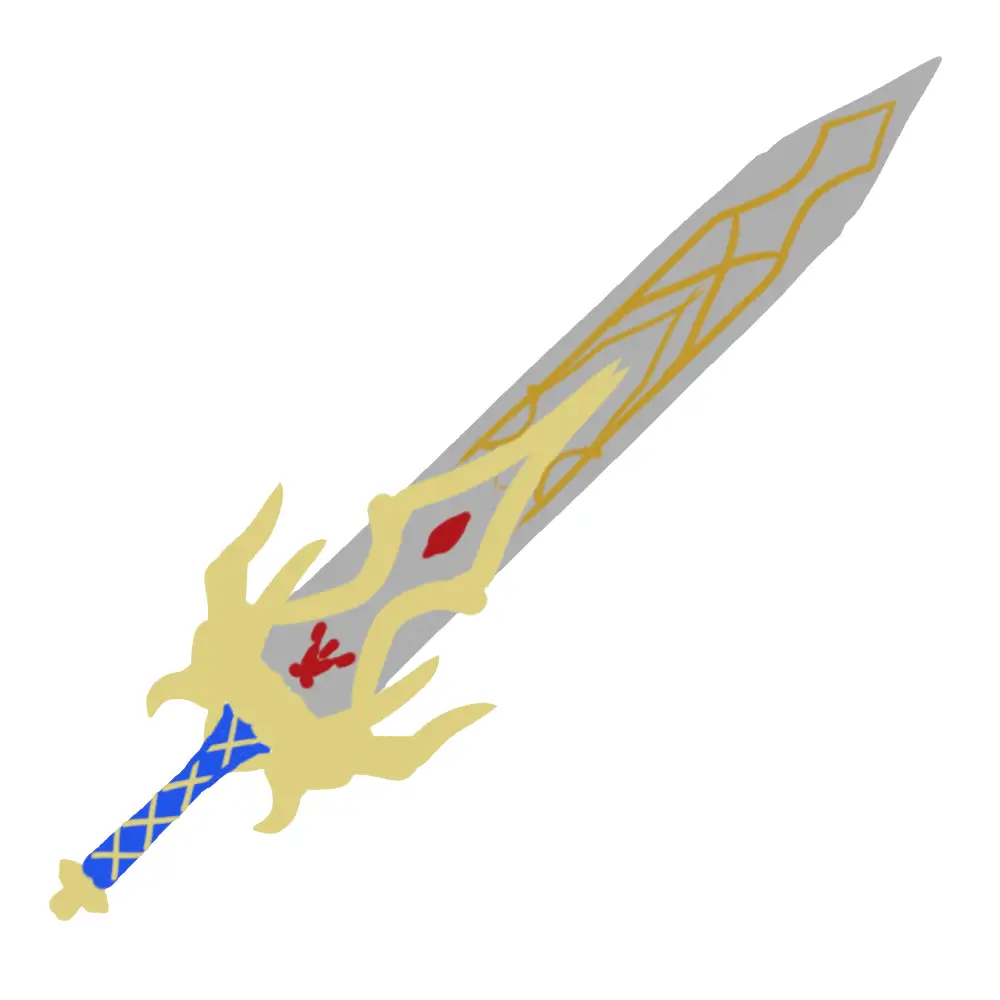
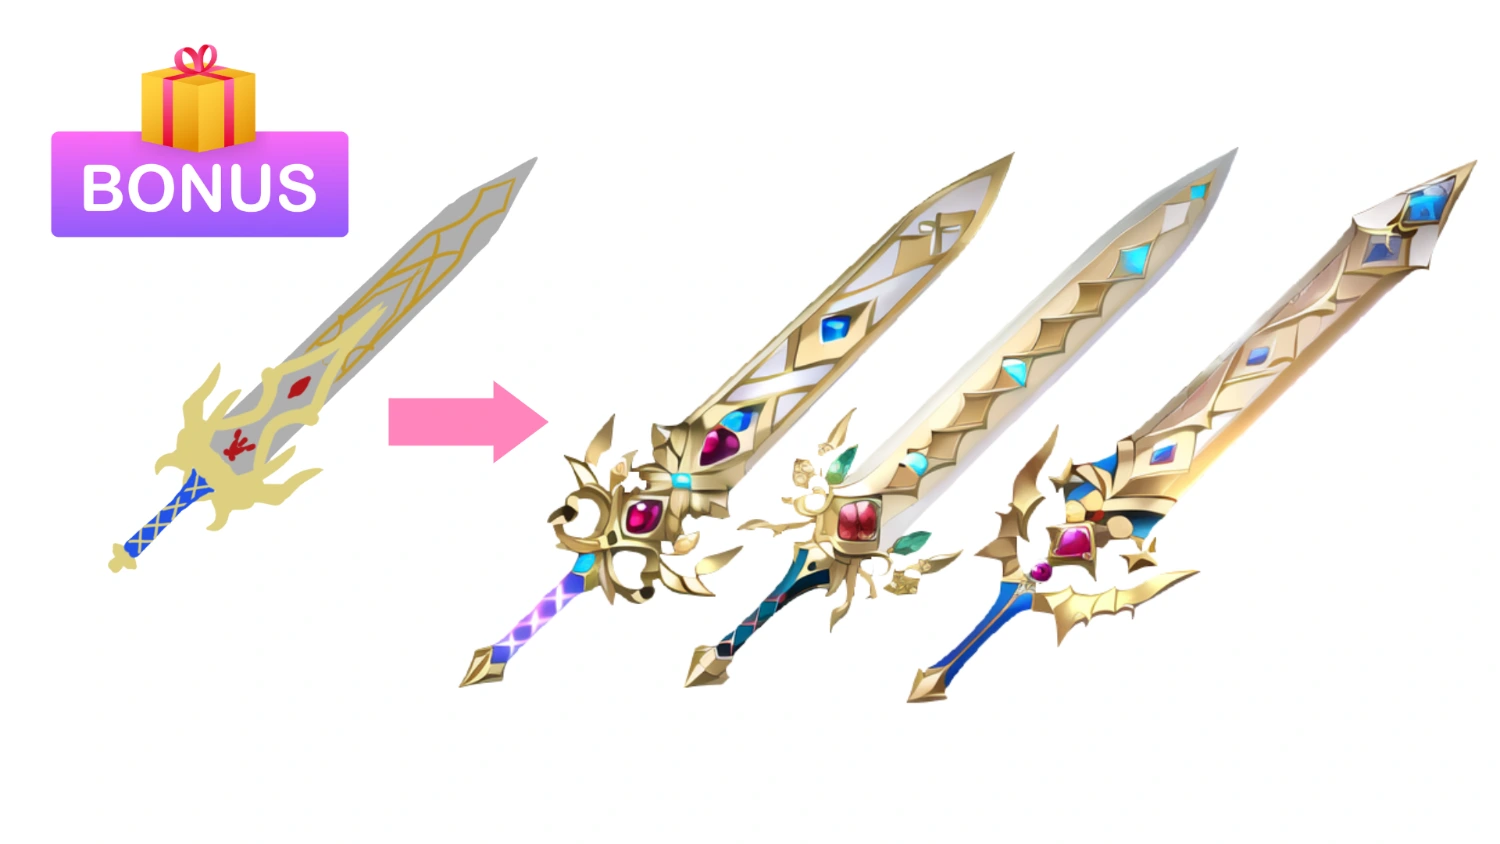
BONUS: Save this image and prompt to try generating your own sword!
Prompt: {masterpiece},{best quality},Amazing,{royal sword}, beautiful detailed gold trim, center image, beautiful detailed magic gold decoration sword, red theme, octane render, jewelry ornament, iridescent
Strength: 0.53
Noise: 0.2
Undesired Content: depth of field, lowres, text, error, extra digit, fewer digits, cropped, worst quality, low quality, normal quality, jpeg artifacts, signature, watermark, username, blurry
Scale: 25
Sampling: k_euler
In conclusion, AI is not just for generating random images. You can also design high-quality objects in an incredibly short amount of time with image to image function as well. It's great for creating new design for any items.
Although there're a lot of controversies related to the ethical issue, AI technology is on a continuous race to become smarter and more accurate as time goes by. It is also a fact that AI applications have so much potential to help the artist significantly reduce working time and add more quality to their artwork.
Finally, if you like art tips and content like this, feel free to subscribe to my weekly newsletter: MiMi Art Tips!
I share my anime art tips and experiences in my digital art career in a weekly email. You'll get the insight and behind the scene of the art career! Really recommend if you're a beginner anime style artist. Click here to subscribe!
Thank you so much for reading this post! I really appreciate your visiting and using your valuable time reading my content!
Much Love 💖

Want to know how to start your anime art journey?
Download my ANIME ART STARTER GUIDE and start your artistic path right away for FREE!